| How
to Use and Adjust the Sling For Target Rifle Shooting By Bob Foth, CMP Director of Training Learning to use and properly adjust a sling is one of the fundamental keys to successful target rifle shooting. The purpose of the sling is to unite with the bones of the support arm to form a solid, triangular-shaped support structure that bears and stabilizes the weight of the rifle. Getting the details right will make the sling more effective and allow you to shoot perfect scores, but I have been amazed to see how few junior shooters use their slings correctly, even at high-level competitions like the Junior Olympic Three-Position Air Rifle Nationals! Start by attaching the sling high on your arm. Attaching it above the triceps muscle should help keep it in place and avoid picking up a pulse. Precision shooters who use shooting jackets should consider using alternatives to a standard sling holder, as many of them are too long and allow the sling to rest too low on the arm. Sometimes you can wrap the straps around the sling instead of using a hook. You can also tighten the straps on the top of the opposite shoulder and make sure the buttons on the front of the jacket are adjusted for a snug fit. Some shooters slide the sleeve down the support arm before getting in position to avoid having the jacket move during firing. Sporter rifle shooters should always wear a sweatshirt or long-sleeved shirt to provide some cushioning on contact points. A tight fitting sweatshirt will stay in place and not slide across the shoulders to allow the sling to slip down the sling arm while in position. You can also use a sling attachment device (like a large safety pin or a sewn-on button) on the sleeve to help keep the sling in position. Sporter shooters must figure out a way to mark their slings so they can have consistent length adjustments. The sling should come from the center of the arm (not the inside, where it is likely to pick up a pulse) and then pass around the back of the wrist and hand without cutting into the wrist. Putting a ˝ twist clockwise (for a right handed shooter) in the end of the sling before attaching it to the sling swivel will allow it to pass smoothly around the side of the wrist and back of the glove hand. Keep a straight and comfortable wrist position. It is essential that the hand fit snuggly against the handstop. This helps you support the weight of the rifle without gripping the stock and keeps your position consistent. A glove is required for comfort. Use sling attachment hardware that does not cause metal parts to put pressure points on your hand. Often smaller is better. Some pieces can be bent to fit the shape of your hand. You may be surprised to find that turning your handstop around backwards can be more comfortable than forwards. This can shift the forces from the area between thumb and index finger to the sling pressing the whole hand against the bottom of the stock. Applying these tips should help you achieve a position where the sling is utilized to the fullest extent and truly supports the rifle. |
 The purpose of the sling is to unite with the bones of the support arm to form a triangular-shaped support structure that bears and stabilizes the weight of the rifle. The shooter in this illustration is Jonas Edman of Sweden, 2000 Olympic gold medallist in the smallbore rifle prone event. His rifle is a Keppler-Anschutz. 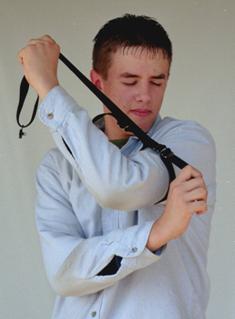 To properly use a sling, sporter class shooters should wear a tight-fitting sweatshirt or shirt that helps to keep the sling in place high on the arm.  Sporter class shooters can use a large safety pin or button to help keep the sling in place  To use a sling effectively, wear a glove and adjust the sling swivel or handstop so that the support hand rests snuggly against it. Don't forget to make the "half-turn-to-the-right twist" in the sling when it is attached so that the sling passes smoothly around the back of the hand. Make sure the hand is completely relaxed-it must not grip the stock. |